Harvesting & Flushes
12 tips in Fruiting & Harvest
By Andrew Langevin · Founder, Nature Lion Inc · Contributing author, Mushroomology (Brill, 2026)
Harvest timing significantly affects flavor, texture, and shelf life. The general rule is to harvest just before or as the mushroom reaches full maturity, before it begins releasing spores. For most cap-and-stem species, this means harvesting when the cap is fully expanded but the edges are still slightly curled downward. Once the cap flattens completely or turns upward, the mushroom is past its prime and releasing spores.
Harvest indicators by species:
- Oyster mushrooms — pick when cap edges are still slightly rolled under, just before they flatten; caps should feel firm and springy
- Shiitake — best when the cap is 70-80% open; the classic partially-curled cap with visible gills but not fully flat
- Button mushrooms and cremini — harvest before the veil (membrane connecting cap edge to stem) breaks
As a practical matter, when growing a cluster, not all mushrooms mature at the same rate. You can either harvest the entire cluster at once when the largest ones are ready, or selectively pick the largest and let smaller ones continue growing for another day or two. Waiting a few hours too long is better than harvesting too early since undersized mushrooms have less flavor and weight.
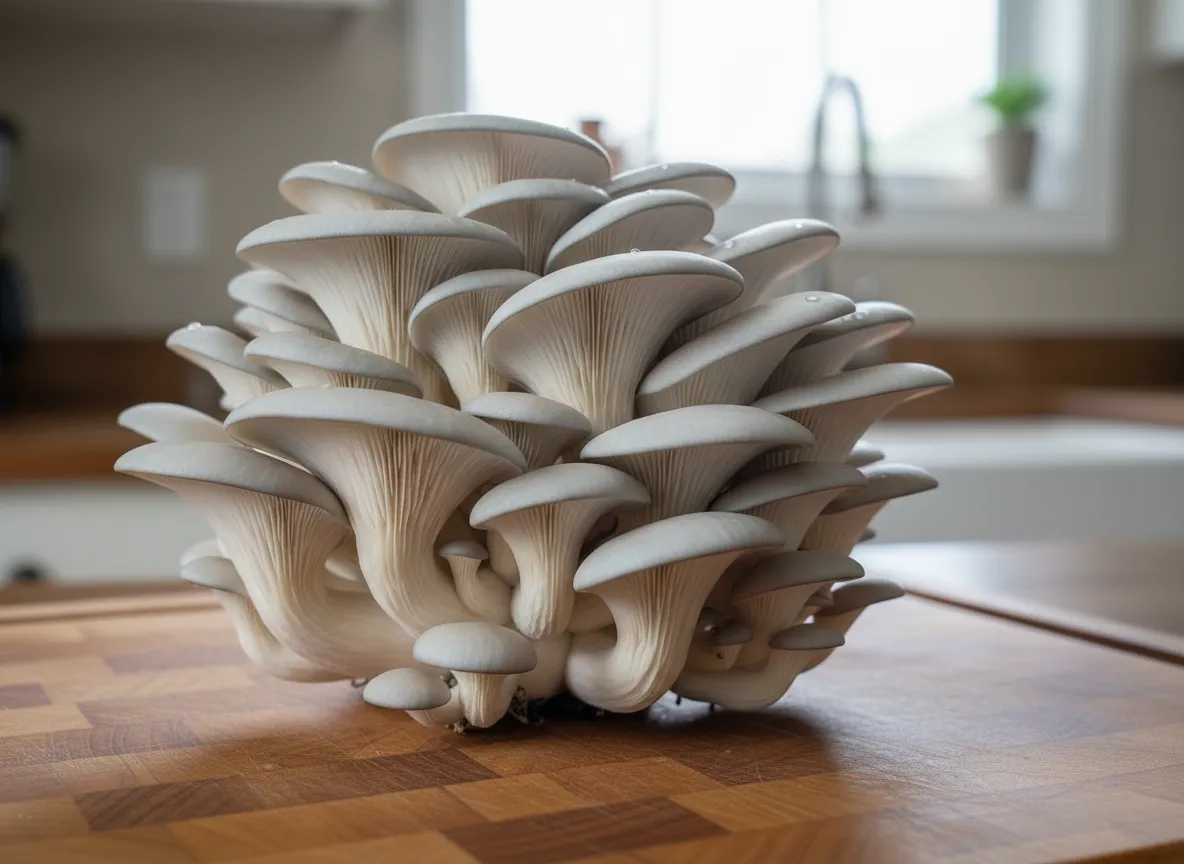
Oyster mushrooms grow in clusters from a single base, so the harvest technique affects both the current crop and future flushes. Harvest the entire cluster at once rather than picking individual mushrooms from it — partial harvesting damages the remaining mushrooms and often causes them to abort anyway.
The two main methods:
- Twist-and-pull — grasp the entire cluster at the base where it connects to the substrate, gently twist, and pull it away cleanly; this removes the entire cluster including the stem base, leaving a clean surface for the next flush; this is the preferred method because it reduces the chance of leftover stem tissue rotting
- Cutting — use a sharp, clean knife to slice the cluster at the base just above the substrate surface; leaves a small stump that will dry out and is eventually overgrown by mycelium; the risk of stumps rotting is higher in humid conditions
Harvest when the largest caps in the cluster have fully expanded but edges are still slightly rolled. In warm weather, oysters can go from perfect to over-mature in just 6-12 hours, so check twice daily. After harvest, trim any substrate material from the base before storing.
Lion's mane (Hericium erinaceus) looks very different from cap-and-stem mushrooms, so the harvest indicators are unique. A lion's mane fruit body starts as a smooth white ball and gradually develops the characteristic cascading teeth (spines). Harvest when the teeth are 1-2cm (about 0.5-0.75 inches) long and the fruit body is still pure white or very slightly cream-colored. At this stage, the texture is firm and the flavor is at its best: mildly sweet with a lobster or crab-like quality.
Signs you've waited too long:
- Teeth elongate to 2-3cm+
- Overall color shifts to yellow or tan
- Texture becomes spongy and slightly bitter
- Dramatically reduced shelf life
Some browning at the very base where it attaches to the substrate is normal and not a concern. To harvest, grip the fruit body firmly at the base and twist gently while pulling. It should come away cleanly. Alternatively, cut at the base with a sharp knife. Do not pull aggressively as you may tear out a chunk of substrate.
If growing from a bag, lion's mane typically fruits from a single cut opening and produces one large fruit body per flush, weighing 150-500g (5-18 oz) depending on block size and nutrition. After harvest, the opening may produce a second fruit body in 10-14 days, usually slightly smaller.
Shiitake should be harvested when the cap is 70-80% open, meaning the edges have uncurled but the cap has not fully flattened. At this stage, you can see the gills clearly but the cap edge still curves slightly downward. The cap surface should feel dry and firm, not slimy or limp.
If the cap has flattened completely and the edges are wavy or turned upward, the shiitake is over-mature and releasing spores. Over-mature shiitake have shorter shelf life and a less desirable spongy texture.
Special grades and techniques:
- For donko-grade shiitake (the premium cracked-cap variety), harvest slightly earlier when the cap is just 50-60% open and the surface shows deep cracks from dry growing conditions — these are prized in Japanese and Chinese cuisine for intense umami flavor and meaty texture
- Grasp the stem near the base and twist gently until it separates from the substrate, or cut at the base with a clean knife
- Shiitake stems are tougher than the caps and are often removed before cooking and saved for stocks and broths
Unlike oyster clusters, individual shiitake can be harvested selectively without disturbing their neighbors since each one grows from its own point on the block. Pick the mature ones first and let smaller ones continue for another 1-3 days.
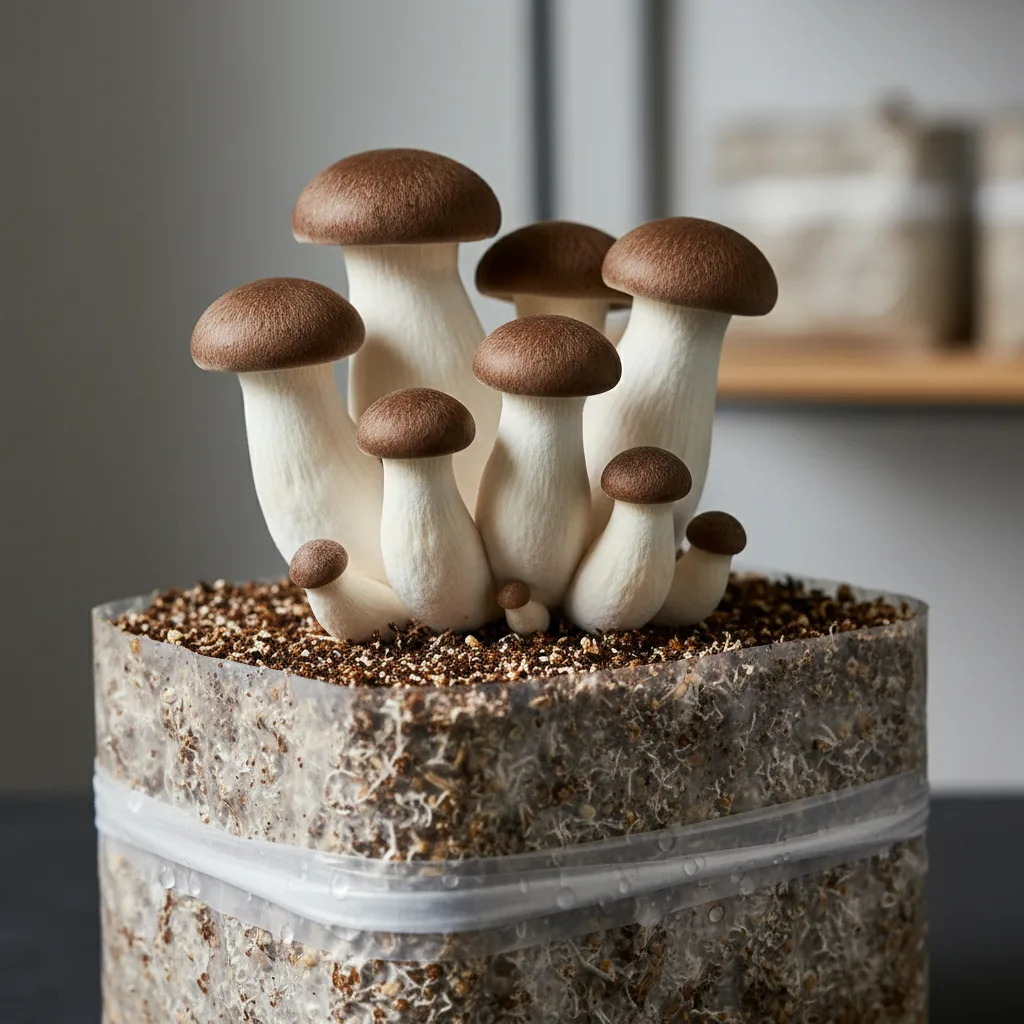
King oyster (Pleurotus eryngii) is valued primarily for its thick, meaty stem rather than its cap, so harvest timing focuses on stem development. Harvest when the stem is firm and 4-6 inches (10-15cm) tall with a smooth, white surface and the cap has just begun to flatten and expand. The cap should be about 2-3 inches in diameter, light brown to tan, and still slightly convex.
Signs of over-maturity:
- Cap fully flattens, curls upward at the edges, or begins releasing spores
- Stem starts to soften and become hollow
To harvest, grip the stem near the base and twist firmly while pulling upward. King oysters have a dense, solid base that attaches firmly to the substrate, so you may need more force than with other mushrooms. Alternatively, cut at the substrate surface with a sharp knife.
Unlike oyster mushrooms that grow in clusters, king oysters often grow individually or in small groups of 2-5 from a single block. Trim any substrate material from the base after harvest. King oysters have excellent shelf life: properly stored in a paper bag in the refrigerator, they keep for 10-14 days. The thick stem holds very little water compared to cap tissue, which contributes to the longer shelf life. For the best culinary results, slice the stems into 1-inch rounds and sear them hard in a hot pan.
Reishi (Ganoderma lucidum) is unlike most culinary mushrooms because it is harvested as a medicinal mushroom, typically dried for tea or powder rather than eaten fresh. The harvest indicators are different from other species.
For shelf-form reishi (the classic fan or kidney-shaped conk), harvest when:
- The white growing edge around the perimeter has stopped advancing
- The surface has developed a full reddish-brown lacquered appearance
- You can see a fine dusting of brown spores on surfaces below the conk
Spore release indicates full maturity. Some growers harvest just before heavy spore release to collect the spores separately, as reishi spore powder is a valued supplement.
For antler-form reishi (grown in high CO2), harvest when the antler tips stop elongating and the white tips begin to darken and harden.
To harvest, cut the conk at the base where it meets the substrate using a sharp knife or small saw. Reishi conks are tough and woody when mature, not soft like culinary mushrooms. After harvest, slice the conk into thin strips (1/8 inch) while it is still slightly pliable, then dry completely in a dehydrator at 130-150F (54-65C). Fully dried reishi slices keep indefinitely in an airtight container and are used for brewing medicinal tea or ground into fine powder for capsules.
A flush is a single wave of mushroom fruiting from a colonized substrate. After you introduce fruiting conditions, the mycelium produces a crop of mushrooms over a period of several days to a couple of weeks; that crop is the first flush. Once you harvest, the mycelium enters a brief rest period (typically 7-14 days) as it rebuilds energy reserves and moisture levels, then produces a second wave: the second flush.
This cycle repeats for multiple flushes until the substrate's nutrients and moisture are depleted. The first flush is almost always the largest, often accounting for 40-50% of the total lifetime yield of the block.
The flush cycle in practice:
- In the wild, mushroom-producing fungi fruit in periodic waves timed to rainfall and temperature patterns
- In cultivation, you control the cycle by harvesting, resting, rehydrating, and re-triggering fruiting conditions
- Each flush typically happens faster than the previous one (from trigger to harvest) but produces fewer mushrooms
Understanding flushes helps you plan your growing schedule: if you know your oyster blocks take 7 days for the first flush plus 10 days rest plus 5 days for the second flush, you can stagger your blocks to have mushrooms ready continuously.
Most mushroom substrate blocks produce 2-3 strong flushes, with up to 5 possible depending on species, substrate nutrition, and care. The first flush produces 40-50% of total lifetime yield, the second flush roughly 25-35%, and the third flush 15-20%. After the third flush, yields drop significantly and contamination risk rises as the substrate weakens.
Flush expectations by species:
- Oyster mushrooms on supplemented sawdust — 2-3 good flushes with biological efficiency of 75-150% over all flushes
- Shiitake blocks — long-lasting, 4-6 flushes over 2-4 months, total biological efficiency of 75-125%
- Shiitake logs — can flush for 3-6 years, though each flush is relatively small
- King oyster — usually 2-3 flushes
- Lion's mane — 2-3 flushes, but second and third are often significantly smaller or produce multiple small fruit bodies instead of one large one
- Reishi — typically only 1-2 flushes for conk formation
- Straw-based substrates — may give only 1-2 strong flushes before becoming too decomposed
Supplemented substrates (with bran, soy hulk, etc.) generally produce more flushes than unsupplemented ones because they contain more nutrition for the mycelium to access across multiple fruiting cycles.
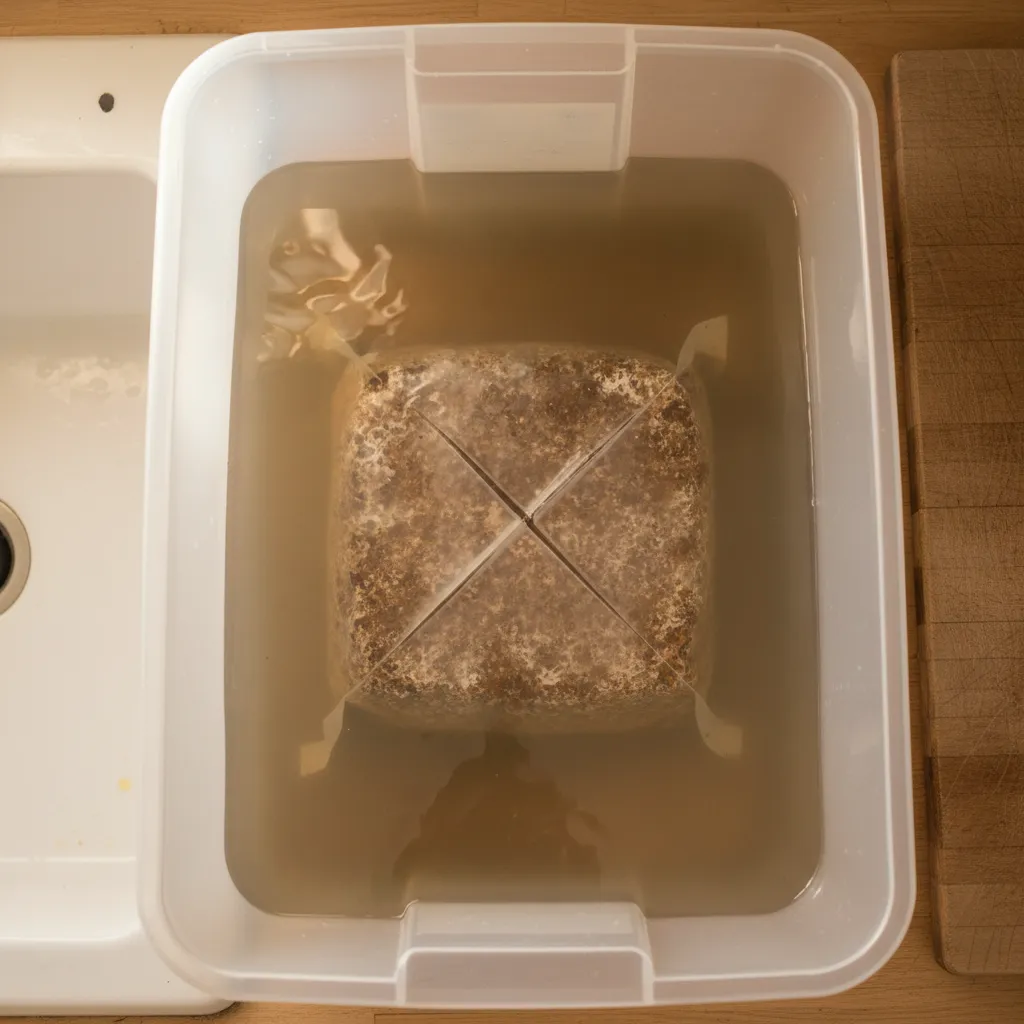
Soaking (also called dunking) between flushes rehydrates the substrate block, which loses significant moisture during each fruiting cycle. Mushrooms are roughly 90% water by weight, so a block that produced a pound of mushrooms has lost nearly a pound of water. Without rehydration, subsequent flushes will be small and pins may abort from insufficient moisture.
The dunking process:
- Remove the block from the fruiting chamber and submerge it in clean, cool water (tap water is fine) in a bucket, cooler, or clean container
- Weight it down with a plate or another container filled with water so it stays submerged
- Soak for 6-12 hours for standard supplemented sawdust blocks, or up to 24 hours for dense shiitake blocks
- Longer soaks (beyond 24 hours) risk waterlogging the substrate and promoting anaerobic bacteria
- After soaking, drain the block for 10-15 minutes, then return it to the fruiting chamber
Expect pins to appear in 5-10 days. For BRF cakes, a 12-24 hour dunk is standard between flushes. Some growers add a pinch of gypsum or a small amount of brown sugar to the soak water as supplemental nutrition, though evidence for this is largely anecdotal. The soak water will be dark and tea-colored, which is normal.
Dunking a monotub is trickier than dunking individual blocks because the substrate slab fills the entire tub and is fragile. The simplest method is to add water directly to the tub after harvesting. Remove all mushroom stumps and aborts from the surface, then slowly pour clean cool water into the tub from one corner until the water level rises to just above the substrate surface.
The soaking process:
- Place a plate or the tub lid on top of the substrate to keep it submerged (it will try to float)
- Let it soak for 8-12 hours
- Carefully tilt the tub and drain all excess water
- Do not leave standing water on the surface as it promotes bacterial contamination
An alternative method: drill a small hole near the bottom of the tub, plug it with a cork or silicone plug during normal use, and open it for draining after the soak.
Some growers skip the soak entirely and instead heavily mist the substrate surface 4-6 times over 24 hours after harvest, allowing the substrate to absorb moisture gradually. This is less effective than a full dunk but is easier and gentler on the substrate cake, which can crack apart during full submersion. For coir-based substrates that start with a lot of moisture, you may not need a full dunk until the second or third flush.
Each flush produces fewer mushrooms because the substrate's finite resources — primarily carbon, nitrogen, and stored moisture — are progressively depleted. The mycelium breaks down complex carbohydrates (cellulose, hemicellulose, lignin) in the substrate and converts them into mushroom tissue. With each flush, there is less available nutrition to fuel the next round.
The first flush has access to the most easily digestible nutrients, which is why it is the largest. By the third or fourth flush, the mycelium has consumed most of the readily available nutrition and must work harder to access the remaining, more recalcitrant compounds.
Additional factors contributing to decline:
- Moisture depletion — each flush removes substantial water, and while dunking helps, the substrate's physical structure degrades over time and holds less water
- Mycelial aging — the mycelium itself loses vitality over successive flushes
- Competing organisms — bacteria and molds become stronger as the mushroom mycelium weakens and the substrate's pH and moisture content shift
- Structural breakdown — what started as a firm block becomes soft, crumbly, and prone to contamination
Supplementation (adding bran, soy hulk, gypsum) to the substrate before colonization provides a larger nutrient pool and generally supports more productive later flushes. But even the best-supplemented substrates reach a point of diminishing returns, usually after the third or fourth flush.
A spent block should be retired when it shows clear signs that productive fruiting is over. For most supplemented sawdust blocks, this happens after 3-4 flushes over 6-10 weeks. Shiitake blocks may last longer, up to 5-6 flushes over 3-4 months.
Key indicators it's time to retire:
- Yields have dropped below 25% of the first flush weight
- The substrate has become soft, crumbly, or falling apart
- Visible green (Trichoderma), black, or orange mold has colonized more than 10-20% of the surface
- The block produces only aborts and tiny pins that fail to develop
- A sour or unpleasant smell has developed
Rather than discarding spent blocks, compost them. Spent mushroom substrate is an excellent garden amendment: it is rich in organic matter, has a near-neutral pH, and the mycelium has partially broken down the wood into forms that plants can eventually access.
Composting options:
- Bury spent blocks 4-6 inches deep in garden beds, under mulch, or in compost piles (sometimes they produce a surprise outdoor flush after rain)
- Crumble spent oyster mushroom blocks into outdoor wood chip beds or straw bales where the mycelium may colonize and continue fruiting seasonally for a year or more
- Do not compost blocks heavily contaminated with Trichoderma in areas near your growing operation, as the spores can spread to your indoor grow
Need more help? Dr. Myco can answer follow-up questions about harvesting & flushes based on thousands of real growing experiences.
Ask Dr. Myco