Fruiting Equipment
12 tips in Equipment & Lab Setup
By Andrew Langevin · Founder, Nature Lion Inc · Contributing author, Mushroomology (Brill, 2026)
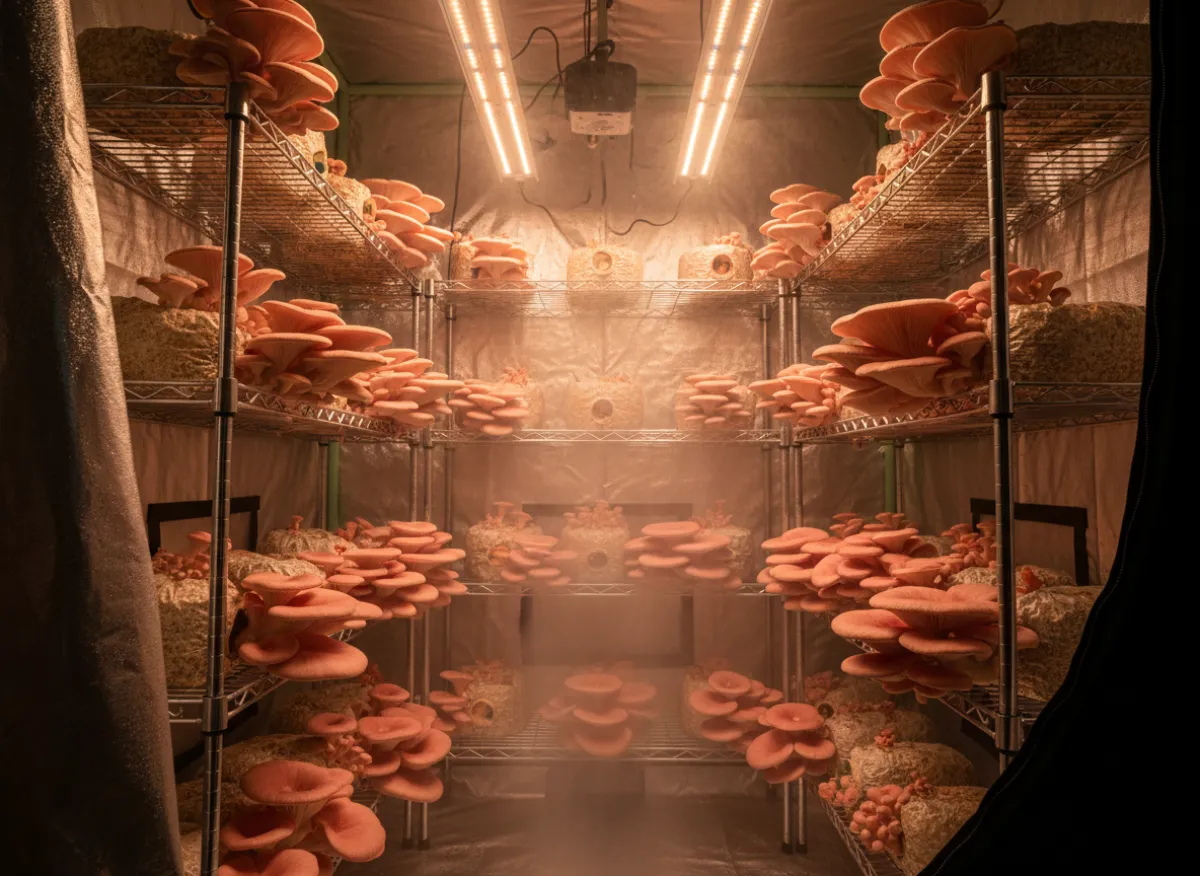
A Martha tent is a greenhouse-style shelving unit enclosed in clear plastic, designed to maintain high humidity for mushroom fruiting. It's the most popular intermediate fruiting setup and costs $60-$120 to build.
Components:
- Wire shelving unit — 4-5 tier, 14"x36"x72" is standard. Chrome or stainless. ($40-$60 from Walmart or Amazon)
- Clear plastic cover — Purpose-made greenhouse covers fit standard shelving sizes ($15-$25)
- Ultrasonic humidifier — Connected via PVC or dryer hose to pump mist inside ($20-$40)
- Humidity controller — Inkbird IHC-200 ($35) to automate the humidifier
- Small fan — For FAE (fresh air exchange), often on a timer
Setup steps:
- Assemble the shelving unit.
- Place the plastic cover over it, leaving the bottom open for air intake.
- Cut a small hole near the bottom for the humidifier hose inlet.
- Cut or leave a small vent at the top for passive air exchange.
- Connect the humidity controller's sensor inside the tent, set to 85-95% RH depending on species.
- Place fruiting blocks or trays on the shelves.
A Martha tent can fruit 8-16 blocks simultaneously, making it ideal for growers scaling beyond monotubs. Many small commercial operations start with 2-4 Martha tents.
Yes, grow tents work excellently for mushroom fruiting and are arguably better than Martha tents in several ways. Cannabis grow tents are light-proof, well-sealed, and have built-in port holes for ducting — all features that benefit mushroom cultivation.
Advantages over Martha tents:
- Better sealed — Zip closures and reinforced ports reduce humidity loss
- Light control — The reflective interior bounces ambient light evenly while exterior blocking lets you control photoperiod
- Built-in ducting ports — Makes humidifier and FAE connections cleaner
- More durable — 600D fabric lasts years vs plastic sheeting that tears
Recommended sizes:
- 2'x2'x4' — Hobby scale, 4-8 blocks ($50-$70)
- 2'x4'x5' — Small commercial, 10-20 blocks ($70-$100)
- 4'x4'x6.5' — Serious production, 20-40 blocks ($100-$150)
Modifications for mushrooms:
- Remove grow lights — Mushrooms need only 12 hours of indirect light, not intense grow lamps. An LED strip or ambient room light is sufficient.
- Add a humidifier through a ducting port.
- Install a small intake fan on a timer for FAE — mushrooms need far more fresh air than cannabis.
Popular brands: Vivosun, AC Infinity, and Gorilla Grow all make quality tents. AC Infinity tents have the best zipper quality, which matters for humidity retention.
Ultrasonic cool-mist humidifiers are the standard for mushroom cultivation. They produce a fine mist that raises humidity quickly without adding heat, and they're affordable and widely available.
Why ultrasonic:
- Produces true mist (tiny water droplets) that stays suspended in air
- No heating element — won't raise temperatures
- Low energy consumption (20-40 watts)
- Quiet operation
- Affordable ($20-$40 for most models)
Avoid these types:
- Evaporative humidifiers — Too slow to maintain 90%+ RH and require filter replacement
- Steam vaporizers — Add unwanted heat and use excessive electricity
- Impeller types — Produce large droplets that wet surfaces unevenly
Top picks for mushroom growing:
- Levoit LV600S ($50) — 6L tank, smart controls, top-fill design. Great for Martha tents.
- Generic 2-disc ultrasonic fogger ($15-$25) — Sits directly in a water reservoir. Maximum output. Industrial but effective.
- Reptile foggers ($20-$30) — Designed for terrariums, perfect for small setups.
Important: Always use distilled or RO water in ultrasonic humidifiers. Tap water mineral content creates white dust that coats your mushrooms and clogs the ultrasonic disc. A jug of distilled water costs $1 at any grocery store.
A never-fill reservoir uses a float valve connected to a larger water supply so you never manually refill your humidifier. This is essential for anyone running a Martha tent or grow tent — small humidifier tanks empty in 8-12 hours at mushroom humidity levels.
Build options:
Option 1 — Float valve in a bucket ($15-$20):
- Get a 5-gallon bucket and a 1/4" float valve (used in evaporative coolers, $8-$12 on Amazon).
- Drill a hole near the top of the bucket and mount the float valve.
- Connect 1/4" tubing from a larger reservoir (another 5-gallon bucket on a shelf above, or a direct water line).
- Place your ultrasonic fogger disc in the bucket. The float valve maintains a constant water level.
Option 2 — Toilet fill valve in a tote ($10-$15):
- Install a standard toilet fill valve in a small storage tote.
- Connect to a garden hose or water supply line.
- Float your ultrasonic disc in the tote.
Option 3 — Gravity feed ($5):
- Invert a water jug into the humidifier tank with the opening submerged.
- Water feeds by gravity as the level drops — like an office water cooler.
Use distilled or RO water regardless of method. A countertop RO system ($150-$200) pays for itself vs buying distilled jugs if you run humidifiers continuously.
The Inkbird IHC-200 ($30-$40) is the most popular humidity controller in mushroom growing. It automates your humidifier by turning it on and off to maintain a target humidity level.
Setup:
- Plug the humidifier into the Inkbird's "Work" outlet.
- Place the Inkbird's humidity probe inside your Martha tent or grow tent at shelf level.
- Set your target humidity (typically 85-95% RH depending on species).
- Set the differential (hysteresis) — usually 3-5%. This means if your target is 90%, the humidifier turns on at 87% and off at 93%.
Recommended settings by species:
- Oyster mushrooms: 85-90% RH, 5% differential
- Shiitake: 80-85% RH, 5% differential
- Lion's Mane: 90-95% RH, 3% differential
- Reishi: 85-90% RH (antler form needs lower)
Pro tips:
- Calibrate the probe — Compare its reading with a separate hygrometer. Inkbird probes can drift 2-5% over time.
- Protect the probe from direct mist contact, which gives false high readings. Wrap it loosely in micropore tape.
- Use the delay function — Set a 30-second compressor delay to prevent rapid cycling that shortens your humidifier's life.
- The Inkbird also has an alarm function — set low and high alarms to catch failures.
Fresh air exchange (FAE) removes CO2 and brings in oxygen, which is critical for proper mushroom fruit body development. High CO2 causes elongated stems, tiny caps, and fuzzy feet. The right fan setup solves this.
Fan options by setup:
Monotub (passive or semi-passive): - Often no fan needed — micropore tape over holes allows passive exchange - For active FAE: a small USB computer fan ($5-$10) on a timer, blowing across the holes
Martha tent: - 4" inline duct fan ($15-$25) mounted in a ducting port, running on a cycle timer - Run 1-5 minutes per hour depending on species and tent volume - Some growers use aquarium air pumps ($10-$15) for gentle, continuous FAE
Grow tent: - AC Infinity Cloudline T4 ($75) — 4" inline fan with built-in thermostat and speed controller. The gold standard. - Vivosun 4" inline ($25) — Budget option, loud but effective.
FAE schedule guidelines:
- Oysters: High FAE — 5 minutes on, 25 minutes off, or continuous low-speed
- Shiitake: Moderate FAE — 3 minutes on, 30 minutes off
- Lion's Mane: Moderate FAE — similar to shiitake
Always balance FAE with humidity. More air exchange means more humidity loss. If adding FAE drops your RH below target, increase humidifier output or reduce fan runtime.
Automated misting removes the biggest daily chore in mushroom growing — manually spraying your fruiting blocks several times a day. There are several approaches depending on your budget and setup.
Option 1 — Humidifier on a controller ($50-$70 total):
- Ultrasonic humidifier + Inkbird IHC-200 humidity controller
- The controller turns the humidifier on/off to maintain target RH
- Best for enclosed setups like Martha tents and grow tents
Option 2 — Misting system on a timer ($30-$50):
- Reptile misting system (MistKing or Exo Terra) with fine nozzles
- Connected to a digital timer with per-minute resolution
- Run 15-30 seconds every 2-4 hours
- Great for open-shelf setups or SGFC chambers
Option 3 — Cycle timer + humidifier ($40-$60):
- A cycle timer (Titan Controls, $20-$30) runs equipment in on/off intervals
- Set humidifier to run 5 minutes on, 30 minutes off
- Simpler than a humidity controller but less precise
Option 4 — Smart plug automation ($15-$25):
- WiFi smart plug (Kasa, Wemo) with scheduling
- Program on/off cycles through the phone app
- Add a cheap humidity sensor for monitoring
The humidity controller approach (Option 1) is the most reliable because it responds to actual conditions rather than running on a fixed schedule.
Accurate temperature and humidity monitoring is essential — but cheap sensors lie. Many budget hygrometers are off by 5-15% RH, which is the difference between perfect pinning and dried-out blocks.
Recommended sensors:
Budget ($10-$20): - Govee H5075 — Bluetooth thermometer/hygrometer with phone app and data logging. Accuracy: ±3% RH, ±0.5°F. Best value in mushroom growing. - ThermoPro TP49 — Basic digital display, no connectivity. Accurate enough for monotubs. $8-$10.
Mid-range ($25-$50): - Govee WiFi sensor — Same accuracy as the Bluetooth model but sends data over WiFi. Check readings remotely. Get alerts for out-of-range conditions. - Inkbird IBS-TH2 — Designed for fermentation/growing. External probe option.
Pro ($50-$100): - SensorPush HT1 — Lab-grade accuracy (±1.5% RH), Bluetooth with optional WiFi gateway. Excellent data logging and graphing.
Calibration tip: Place your sensor in a sealed bag with a small cup of saturated table salt solution. After 12 hours, it should read exactly 75% RH. If it's off, note the offset and adjust your readings mentally, or use the calibration function if available.
Place sensors at mushroom height, not at the top of the tent where hot, humid air rises and gives misleading readings.
The SGFC is a classic beginner fruiting chamber made from a plastic tote with holes drilled on all six sides. It's been the go-to for BRF cake fruiting (PF Tek) for over two decades and costs under $15 to build.
Materials:
- Clear 56-66 quart storage tote with lid ($8-$12)
- 1/4" drill bit and drill
- Perlite — coarse grade, 4-8 quarts ($5-$8)
Construction:
- Mark a grid of holes spaced 2 inches apart on ALL six sides (all four walls, the bottom, and the lid).
- Drill all holes with the 1/4" bit. You'll drill 100+ holes — go slow to prevent cracking.
- Soak coarse perlite in water until saturated, drain excess.
- Fill the bottom of the tote with 4-5 inches of wet perlite.
- Place the tote on 4 bottle caps or small blocks to elevate it, allowing airflow through bottom holes.
How it works:
- The wet perlite maintains humidity through evaporation (~85-95% RH)
- The holes on all sides allow passive fresh air exchange — warm moist air rises out the top while fresh air enters from the bottom and sides
- This convection cycle is called the "chimney effect"
Fan the lid 2-3 times daily for 30 seconds to boost FAE. Re-soak perlite every 5-7 days or when humidity drops below 80%.
Monotub hole placement and covering determine your FAE and humidity balance — getting this right eliminates most fruiting problems. The standard design uses 2-inch holes covered with various filter materials.
Standard hole layout (66-quart tub):
- 2 holes on each long side — Positioned 4-5 inches from the bottom (just above substrate level). These are your main FAE ports.
- 2 holes on each short side (optional) — Additional exchange for species needing high FAE.
- No holes in the lid — Keep the lid flipped or cracked for top venting, or add 1-2 holes.
Hole covering options:
- Micropore tape (3M brand) — 1-2 layers for moderate FAE. Easy to adjust by adding/removing layers. The most popular choice.
- Polyfill stuffing — Stuff loosely into holes. Provides filtration and adjustable airflow. Pull out more for increased FAE.
- Synthetic filter discs — Cut from furnace filter material. Glued over holes with silicone. More permanent but clean-looking.
Dialing in your monotub:
- Fuzzy feet (aerial mycelium) on pins = not enough FAE. Remove a layer of tape or pull out some polyfill.
- Pins drying out or aborting = too much FAE or not enough humidity. Add tape layers or mist more.
- Long skinny stems, small caps = CO2 too high. Increase FAE significantly.
Start with more tape (restricted flow) and gradually open up based on how your mushrooms respond.
Mushrooms don't photosynthesize, but they do use light as a directional cue for fruit body development. The light requirements are minimal — far less than plants — but having some light source improves results.
What mushrooms need:
- 12 hours on, 12 hours off — Mimics natural day/night cycle
- Indirect ambient light is often sufficient — a room with a window works
- Blue spectrum (6500K) is ideal — mushrooms have blue-light photoreceptors
- Intensity: 50-200 lux — Roughly the brightness of a well-lit room, not direct sunlight
Lighting options:
- Ambient window light — Free. Works perfectly for most setups. Just don't place in direct sun (too much heat).
- 6500K LED strip ($8-$15) — Stick-on strips from Amazon. Put on a 12-hour timer. Low power (5-10 watts).
- 6500K CFL or LED bulb ($3-$5) — A single daylight-spectrum bulb in a clip lamp aimed at your tub.
- Aquarium LED strips ($10-$20) — Waterproof, designed for humid environments.
What to avoid:
- Direct sunlight — causes temperature fluctuations
- Grow lights designed for plants — way too intense and produce unnecessary heat
- Incandescent bulbs — too much heat per lumen
- Complete darkness — causes abnormal growth patterns, elongated stems searching for light
Don't overthink lighting. If you can read a book comfortably in the room, your mushrooms have enough light.
A fully automated fruiting chamber manages humidity, FAE, temperature, and lighting without daily intervention. Build one and you only need to check on your mushrooms every few days.
Components for a complete automation build ($150-$300):
- Grow tent or Martha tent — Your enclosure ($50-$100)
- Ultrasonic humidifier + never-fill reservoir — Continuous humidity supply ($30-$50)
- Inkbird IHC-200 — Humidity controller ($35)
- 4" inline fan — For FAE, connected to a cycle timer ($20-$40)
- Cycle timer — Runs the fan on intervals (e.g., 5 min on / 25 min off) ($15-$25)
- 6500K LED strip on a timer — 12/12 light cycle ($10-$15)
- Govee WiFi sensor — Remote monitoring and alerts ($15-$25)
Advanced additions ($100-$200 more):
- Inkbird ITC-308 temperature controller — Manages a small heater for winter growing ($35)
- CO2 monitor — Track CO2 levels to optimize FAE timing ($30-$60)
- Smart power strip — Control everything from your phone ($25-$40)
- Small camera — Monitor growth remotely ($20-$30)
Automation sequence:
- Humidity drops below 88% → Inkbird turns on humidifier
- Cycle timer runs FAE fan 5 minutes every 30 minutes
- LED strip runs 6 AM to 6 PM
- Govee sensor alerts your phone if conditions go out of range
Start simple and add automation incrementally. The humidity controller alone eliminates 80% of manual work.
Need more help? Dr. Myco can answer follow-up questions about fruiting equipment based on thousands of real growing experiences.
Ask Dr. Myco