Prevention & Sterile Technique
12 tips in Contamination & Troubleshooting
By Andrew Langevin · Founder, Nature Lion Inc · Contributing author, Mushroomology (Brill, 2026)
Sterile technique is the foundation of successful mushroom cultivation because you are working with nutritious substrates that every organism in the environment wants to eat. Your grain, agar, and liquid culture media are essentially petri dishes of food — if anything besides your target mushroom gets access, it will grow. The air in a typical room contains thousands of mold spores and bacteria per cubic meter.
Every step in the process is a potential contamination entry point:
- Every surface you touch carries potential contaminants
- Every breath you exhale introduces bacteria
- Every air current passing through your workspace delivers mold spores
Sterile technique is not about being paranoid — it is about creating a controlled environment where your mushroom has the best possible chance of being the only organism in the container. This means:
- Sterilizing your substrate to kill existing organisms
- Working in clean air to prevent introducing new ones
- Maintaining sealed containers with proper filters to keep contaminants out during colonization
Professional labs maintain over 99% clean rates. Hobby growers should aim for at least 90%. If you are below that, your technique needs work. Some growers get away with sloppy technique for a while, especially with aggressive species like oyster mushrooms, but eventually the contamination catches up.
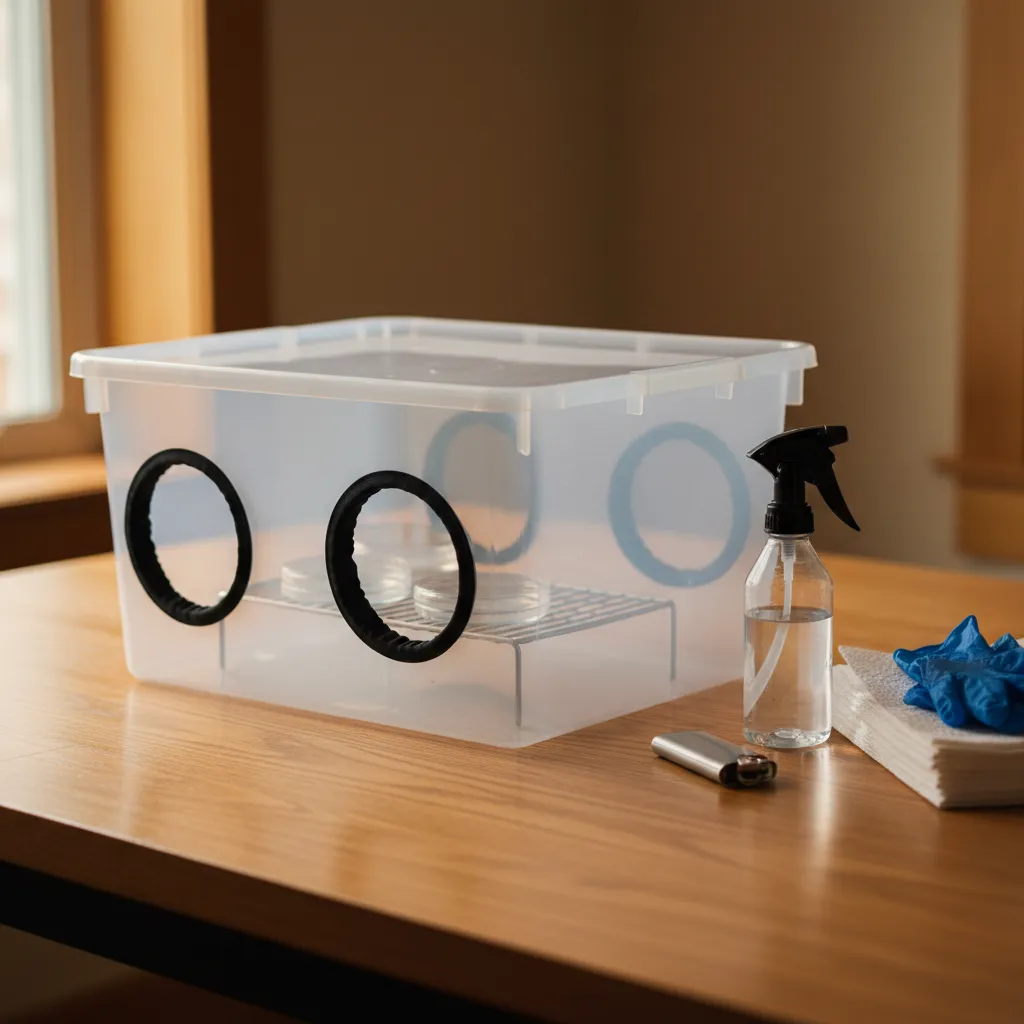
A still air box is a clear plastic tub with two arm holes cut in one side, and when used correctly it is remarkably effective at preventing contamination — some growers achieve flow-hood-level results with a well-used SAB. The key principle is that contaminant spores are carried on air currents; in still air, spores settle downward by gravity and stop moving. Your work happens above the settled spores in the cleanest zone.
Setup before each session:
- Wipe the interior of the SAB with 70% isopropyl alcohol and let it dry
- Place all your materials inside — jars, agar plates, scalpel, lighter, alcohol spray bottle — before you start
- Spray the air inside the box heavily with 70% alcohol and wait 5 minutes for particles to settle
Critical technique during use:
- Every movement inside the box should be slow and deliberate — fast movements create air currents that stir up settled spores (this is the most common SAB mistake)
- Flame-sterilize scalpels and needles inside the box
- Work directly above a flame updraft when possible, as rising hot air pushes contaminants away
- Never remove your arms and reinsert them without re-settling the air with alcohol spray and a five-minute wait
- Keep a small alcohol lamp or lighter inside for sterilization
A laminar flow hood pushes HEPA-filtered air across your workspace in a smooth, unidirectional stream, creating a curtain of clean air that sweeps contaminants away from your work. It is the gold standard for sterile technique and virtually eliminates airborne contamination when used correctly.
Setup:
- Turn on the flow hood at least 15 minutes before working to purge the workspace of ambient air
- Wipe the work surface and interior walls with 70% isopropyl alcohol
Critical workflow principles:
- Everything you work on should be between you and the filter — clean air flows from the filter toward you
- Your hands, tools, and body should be downstream — between the work and you, not between the filter and the work
- Never pass your hands or any non-sterile object between the filter face and your open containers
- Never reach over an open plate to grab something behind it
- Work close to the filter face where air velocity is highest and most laminar
Common mistakes to avoid:
- Crossing arms over work
- Coughing or sneezing toward the hood
- Placing tall objects in the airstream that create turbulent eddies behind them
A flow hood does not make you invulnerable — sloppy technique in front of a flow hood will still cause contamination, just less than sloppy technique without one.
Flame sterilization ensures that your scalpel, inoculation loop, or needle is completely free of contaminants before it touches your cultures. The metal must reach at least 500 degrees Celsius to kill all organisms including bacterial endospores, and a visible red glow confirms you have reached that temperature.
The technique:
- Hold the metal portion of your tool in the flame of an alcohol lamp, butane lighter, or propane torch
- Hold it in the flame until it glows red-hot — at least 10 seconds to ensure heat penetrates
- Let the tool cool for a few seconds before touching your agar or grain — a red-hot scalpel will kill the mycelium you are trying to transfer
Cooling methods:
- For inoculation needles — Cool the tip by touching it briefly to sterile agar at the edge of your plate, away from any growth
- For scalpels — Hold it still in your clean airstream for 5 to 10 seconds; do not wave it around or blow on it, as both introduce contaminants
Re-sterilize between every single transfer. If you cut a piece of agar from plate A and place it on plate B, flame your scalpel before going back to plate A. This prevents cross-contamination between plates. Never set a sterilized tool down on any surface — hold it or place it in the flame until you need it.
This is one of the most counterintuitive facts in microbiology: 70% isopropyl alcohol is a significantly more effective disinfectant than 91% or 99%. The reason is water. Alcohol kills microorganisms by denaturing their proteins and dissolving their cell membranes, but this process requires water to work effectively.
Why higher concentration is actually worse:
- Pure alcohol dehydrates the outside of bacterial cells too quickly, forming a protective coagulated protein layer on the cell surface that shields the interior
- With 70% alcohol, the 30% water content keeps the cell surface hydrated, allowing the alcohol to penetrate through the cell membrane and denature internal proteins
- Think of it like cooking an egg: extreme heat solidifies the outside and insulates the inside, while moderate, sustained heat cooks it all the way through
The water in 70% alcohol also slows evaporation, giving the alcohol more contact time with microorganisms.
For mushroom cultivation:
- Use 70% isopropyl for wiping surfaces, spraying your SAB interior, and cleaning hands and arms
- You can make it from 91% or 99% by diluting with distilled water
- Spray surfaces and let them air dry — do not wipe off the alcohol; the drying time is the killing time
Cleaning your growing area is a critical but often neglected part of contamination prevention. Start by removing all organic debris — spent substrate, fallen mushroom fragments, spilled grain, and any contaminated materials. These are food sources for mold and bacteria that will continuously recontaminate your space.
Cleaning protocol:
- Wipe all hard surfaces with a 10% bleach solution (1 part household bleach to 9 parts water) and let it sit for at least 10 minutes before wiping dry
- Follow up with 70% isopropyl alcohol on surfaces where you will be handling cultures
- Seal exposed wood with paint or polyurethane — raw wood is porous and harbors contaminants that are impossible to remove by surface cleaning
- Mop floors with bleach solution, paying special attention to corners and edges
- Clean humidifier reservoirs with bleach at least weekly — standing water is a breeding ground for bacteria and mold that get aerosolized
- Replace HVAC filters in the room regularly
Smooth, non-porous surfaces like plastic, stainless steel, and painted walls are vastly easier to keep clean than porous materials. Clean between every batch, not just when you see problems. Prevention is far easier than remediation. Consider running a standalone HEPA air purifier as well.
Airborne contaminants are the primary source of infection in mushroom cultivation, and reducing their concentration makes every other aspect of sterile technique more effective. The most impactful step is running a HEPA air purifier in your growing room. A true HEPA filter removes 99.97% of particles 0.3 microns and larger, which includes virtually all mold spores and bacteria.
Key steps to reduce airborne contamination:
- Run a HEPA air purifier sized to cycle the room air at least four times per hour; let it run continuously, not just during work sessions
- Remove organic materials from the growing area — cardboard, paper, fabric, and other materials that harbor spores
- Keep pets out — animal dander and microorganisms they carry add significantly to contamination loads
- Seal gaps around doors and windows to reduce unfiltered outside air
- Keep the room slightly positive-pressure by having filtered air input without exhaust, so air leakage flows outward
Timing and technique also matter:
- Avoid sweeping or vacuuming right before sterile work — these launch settled particles into the air; damp-mop instead
- Time your sterile work for periods when the air has been undisturbed for at least 30 minutes, allowing airborne particles to settle
- Do not keep plants, soil, or compost in or near your growing space
Opening a contaminated jar or bag indoors is one of the most damaging mistakes a mushroom grower can make, and it is surprisingly common. A single contaminated jar can contain billions of mold spores, particularly if the contamination has been growing for days and has reached the sporulation stage. When you open that container, those spores become airborne instantly and spread throughout your entire growing space.
Trichoderma spores are especially problematic — they are tiny, lightweight, and remain airborne for hours. A single opened Trichoderma jar can elevate the spore count in a room to levels that overwhelm your sterile technique for weeks. Those spores settle on every surface, get into HVAC ducts, lodge in carpet and fabric, and create a persistent contamination reservoir.
The proper procedure:
- If you identify or suspect contamination, seal the container — do not open it
- Tape the lid if necessary
- Take it outside and dispose of it in a sealed plastic bag
- If you absolutely must open it for diagnosis, do it outdoors and downwind from your growing area
- Wash your hands and change your shirt before going back to your clean workspace
This simple practice will prevent more contamination than almost any other single habit. Many growers have traced catastrophic contamination events — where every jar in a batch fails — back to a single moment when they opened a contaminated container indoors.
Bleach (sodium hypochlorite) is one of the most effective and cheapest disinfectants available to mushroom growers. A 10% solution — 1 part standard household bleach to 9 parts water — kills mold spores, bacteria, and viruses on contact with sufficient exposure time. Use it for wiping down surfaces, soaking tools and equipment, cleaning humidifier reservoirs, and sanitizing work areas between batches.
Key rules for effective bleach use:
- Contact time is essential — spray or wipe the solution on and let it sit wet for at least 10 minutes before rinsing or allowing it to dry; a quick wipe-and-dry does not work
- Always make fresh bleach solution for each cleaning session — diluted bleach loses effectiveness within 24 hours as sodium hypochlorite degrades
- Undiluted bleach from the bottle retains potency for months if kept sealed, cool, and dark, but diluted solutions degrade rapidly
Important warnings:
- Bleach corrodes metals — do not use it on stainless steel tools you want to preserve; rinse metal surfaces with water after treatment
- Never mix bleach with other cleaners, especially ammonia or acids, as the resulting gases are toxic
- Use bleach in ventilated areas and wear gloves
For your growing room, bleach is ideal for floors, walls, plastic tubs, and shelving. Use isopropyl alcohol for surfaces that will contact cultures directly.
HEPA filtration is the most effective technology available for removing airborne contaminants from your mushroom growing environment. A true HEPA filter captures 99.97% of particles at 0.3 microns — the most penetrating particle size. Most mold spores range from 2 to 20 microns, and bacteria range from 0.5 to 5 microns, so a HEPA filter captures virtually all of them.
HEPA filtration is used in two main ways:
- Laminar flow hoods — A HEPA filter creates a continuous stream of sterile air across your workspace
- Standalone air purifiers — Continuously cleans room air to reduce ambient contamination levels
Sizing guidelines:
- For your growing room, choose a purifier with a Clean Air Delivery Rate high enough to filter the room volume at least four times per hour (a 200-square-foot room with 8-foot ceilings needs about 400 CFM)
- For a DIY flow hood, use a HEPA filter rated for your blower's airflow, typically 2x4 feet; face velocity should be between 75 and 100 feet per minute for proper laminar flow
Maintenance tips:
- Pre-filters extend HEPA life dramatically by catching larger particles before they reach the expensive HEPA filter
- Change pre-filters monthly and your HEPA filter will last years
- Run purifiers continuously, not just during work sessions
Do not buy ionizers or UV purifiers as HEPA substitutes. They do not remove particles from the air the way physical filtration does.
Yes, season significantly impacts contamination rates, and understanding the pattern helps you plan your growing schedule. The variation comes from differences in temperature, humidity, airborne spore counts, and how buildings are ventilated throughout the year.
Seasonal contamination patterns:
- Summer (worst) — Warm, humid air supports massive airborne mold spore counts; Trichoderma and Aspergillus populations peak in late summer; higher temperatures accelerate contaminant growth; windows and fans pull unfiltered outside air through growing spaces
- Winter (best) — Cold air holds fewer mold spores; furnace-heated indoor air is very dry and hostile to mold; homes are sealed with less outdoor air exchange
- Spring — Brings a burst of mold activity as temperatures rise and moisture increases
- Fall — Leaf decomposition releases huge amounts of mold spores outdoors
Many experienced growers schedule their grain-to-grain transfers and agar work for the colder months to take advantage of naturally lower contamination pressure.
If you grow year-round, compensate for seasonal variation by increasing sterile precautions in summer: run your air purifier on high, reduce the number of jars you have open at once, and consider doing all sterile work early in the morning when air is coolest and most still.
Gloves are useful in mushroom cultivation, but they are not a substitute for proper hand hygiene, and wearing them incorrectly creates a false sense of security. Nitrile gloves provide a clean, smooth surface that is easier to sterilize with alcohol than bare skin — skin has pores, hair follicles, and crevices that harbor microorganisms, while glove surfaces are smooth and non-porous.
The most important thing to understand about gloves is that they become contaminated the moment you touch a non-sterile surface. A gloved hand that touches your face, your phone, or the outside of a jar is just as contaminated as a bare hand. Gloves do not stay clean — you must re-sterilize them with alcohol frequently throughout your work session.
When to use gloves:
- Bulk substrate work — Mixing spawn into pasteurized substrate benefits from the smooth surface that reduces what you introduce
- General handling — Nitrile gloves sprayed with 70% isopropyl alcohol before and during work
When bare hands may be fine:
- Flow hood or SAB work — Many experienced growers prefer bare hands washed with soap and sprayed with alcohol, finding them more dexterous
Vinyl gloves are cheaper but less durable. Nitrile gloves are standard. Latex works but some people have allergies. Whatever you use, make the alcohol spray your constant companion.
Need more help? Dr. Myco can answer follow-up questions about prevention & sterile technique based on thousands of real growing experiences.
Ask Dr. Myco